Install Single Node OpenShift on Intel® 10th gen NUC
---
 Posted by James Read
on March 01, 2023 ·
15 mins read
Posted by James Read
on March 01, 2023 ·
15 mins read
Contributors:


 Posted by James Read
on March 01, 2023 ·
15 mins read
Posted by James Read
on March 01, 2023 ·
15 mins read
This post is an update for 4.10 / 2023, from the original blog post in 2021, which contains some minor screenshot and version updates.
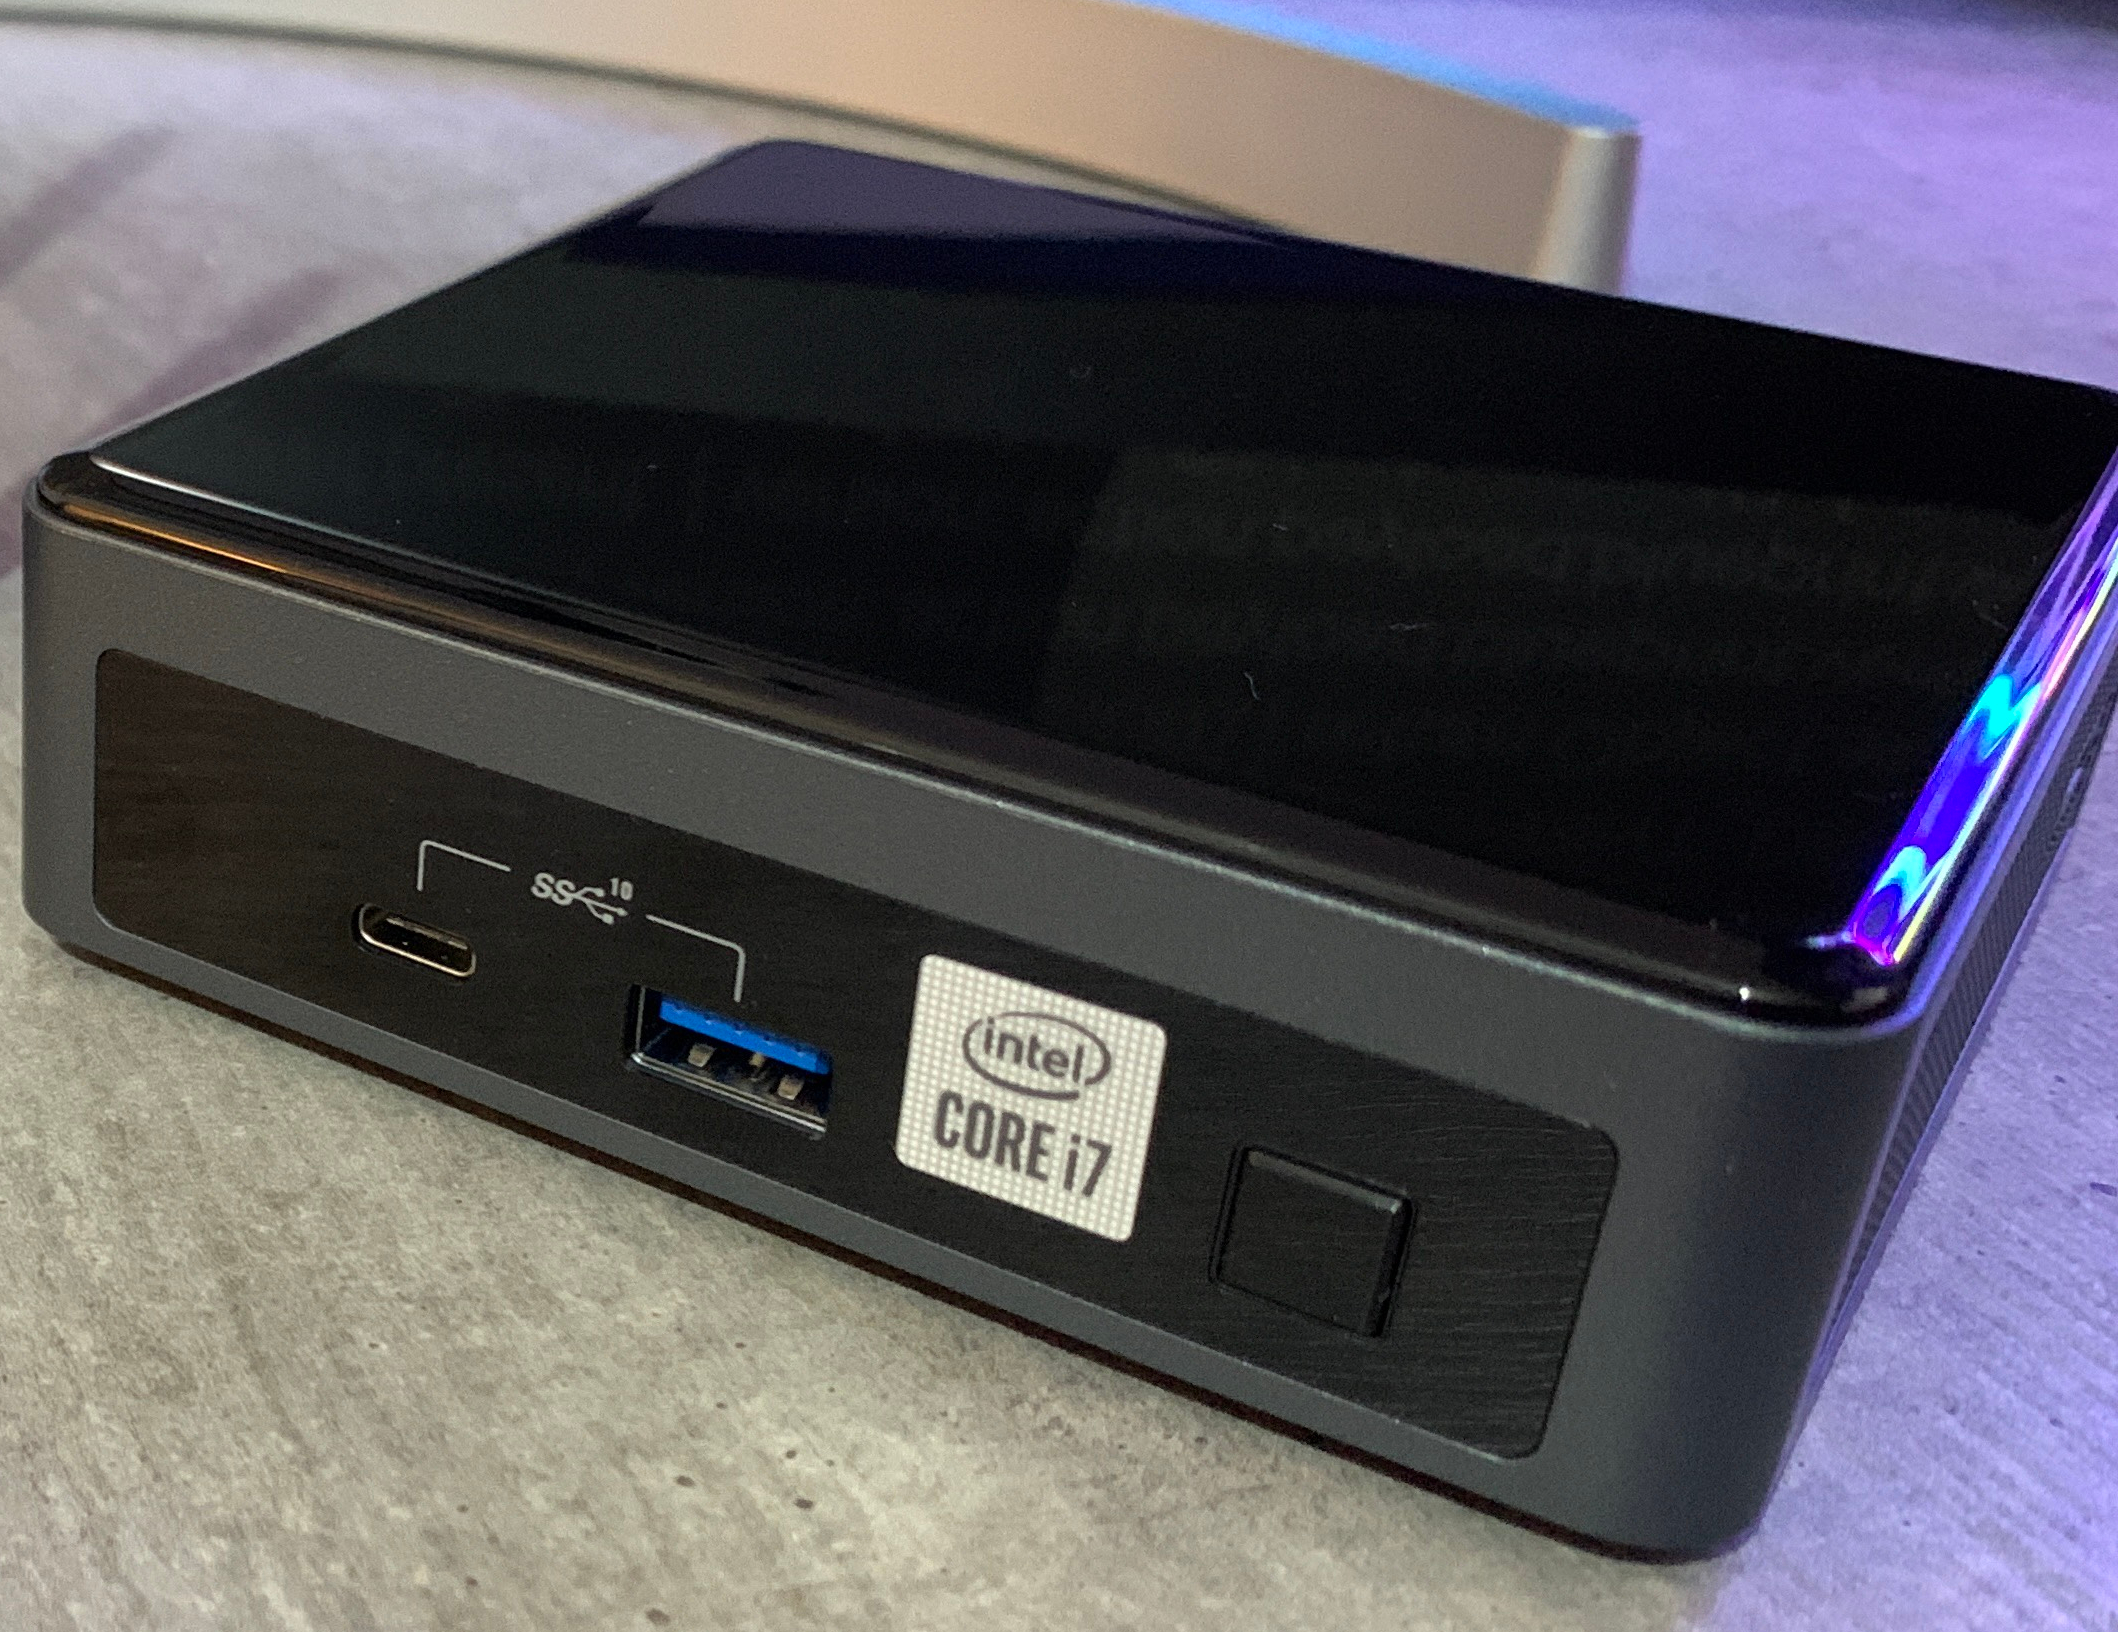
The next guide will show how to deploy a Single Node Openshift (SNO) to a physical Intel® NUC.
Minimum prerequisites for the installation of single node openshift must be respected so I decided to provision a set of hardware components powerful enough to run services on the platform once it’s been installed from both the computational power and the resources availability perspective.
Let’s have a look at what it’s needed to install Single Node Openshift on a 10th gen Intel® NUC.
Intel NUC model |
NUC10i7FNK |
Memory capacity |
64.00 GiB |
CPU model name |
Intel® Core™ i7-10710U CPU @ 1.10GHz |
CPU cores and clock speed |
6 cores (12 with hyper-threaded) at 4,700 MHz |
CPU architecture |
x86_64 |
SSD Disk |
Samsung SSD M.2 256GB |
SNO requires the following minimum host resources:
Virtual CPU |
8 |
Virtual RAM |
32 GB |
Storage |
120 GB |
In order to go through the installation process, the following additioal components are required:
And a Red Hat account, with access to https://console.redhat.com/openshift/
USB flash drive >= 2GB
DHCP is required like IPI (Installer Provisioned Infrastructure) installations
The following are optional requirements, but highly recommended:
Generated a ssh key to connect to the node from your computer with ssh
Example:
$ ssh-keygen -t ed25519 -N '' -f ~/.ssh/id_rsa

$ cat ~/.ssh/id_rsa.pub
ssh-rsa AAAAB3NzaC1yc[...]Deploying Openshift clusters with a discovery ISO is a functionality in Tech-Preview.
The above taking into consideration that the fully SNO installation is a proof-of-concept without high availability or support.
The use of the discovery ISO will help us especially in this case by not working with VMs.
We will burn it to the USB memory to launch the installation process, without any interaction required until the SNO installation ends.
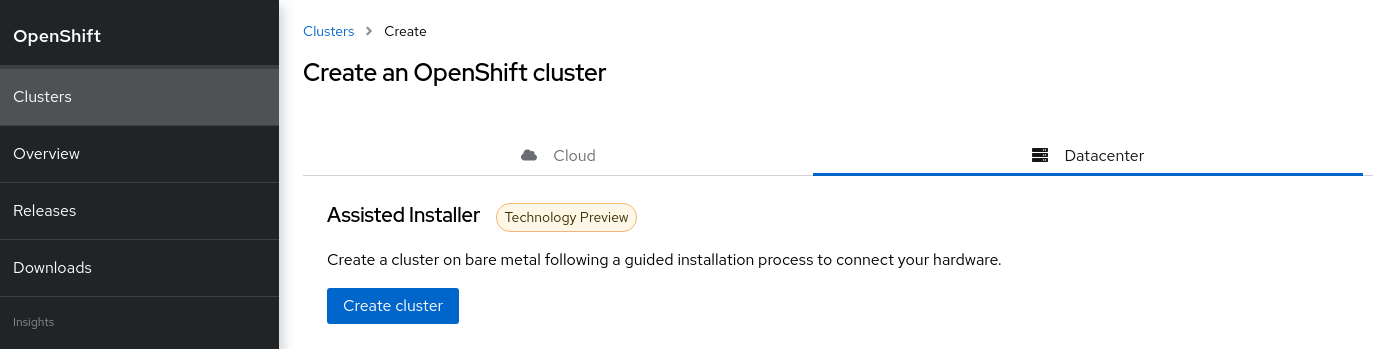
To create the discovery ISO you need to login and access https://console.redhat.com/openshift/
Once you are there, click on the “Create cluster” button, select Datacenter.
Then under Assisted Installer, push the new Create cluster button.
Note: During testing for this hackfest, it seems that SNO 4.11 and 4.12 cause kernel panics after bootstrap. 4.10 works, and is close enough to the ARO clusters (4.11) to work. You may try other versions, or upgrades, at your leisure.
You’ll be asked to fill a form with the following info:
Set the Cluster name and Base domain.
Mark the checkbox to install single node OpenShift (SNO) and accept the warning message.
Select the OpenShift version: 4.10.52
Edit pull secret (no need to).
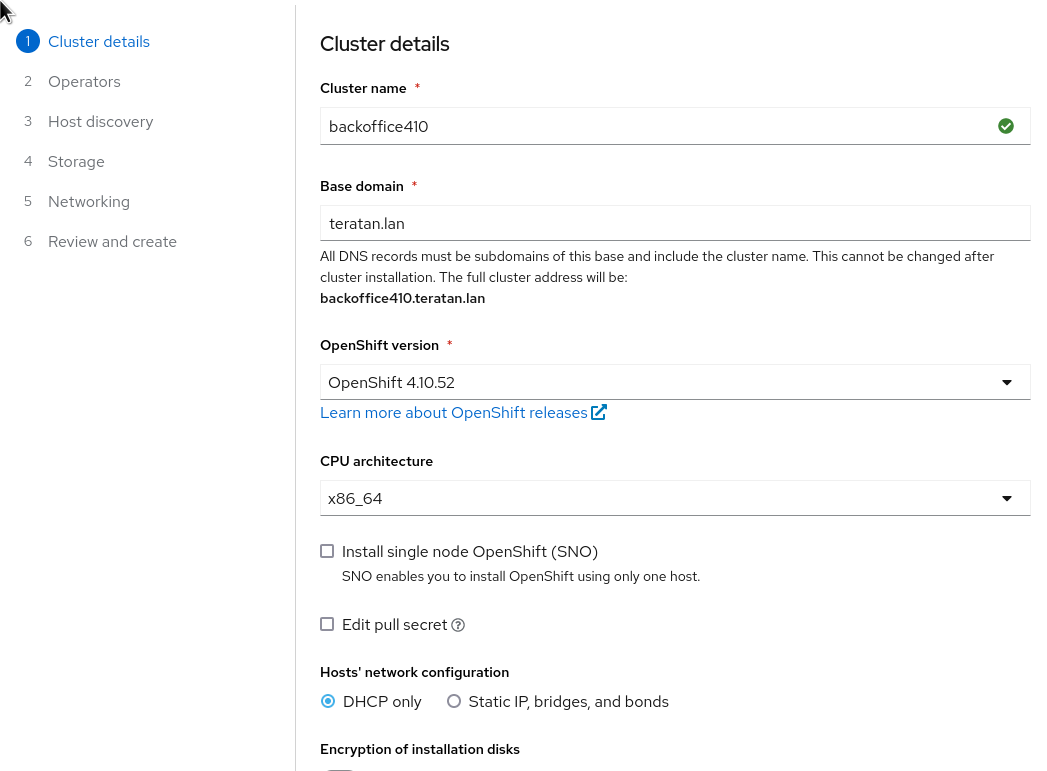
Click Next to continue to the Host discovery section:
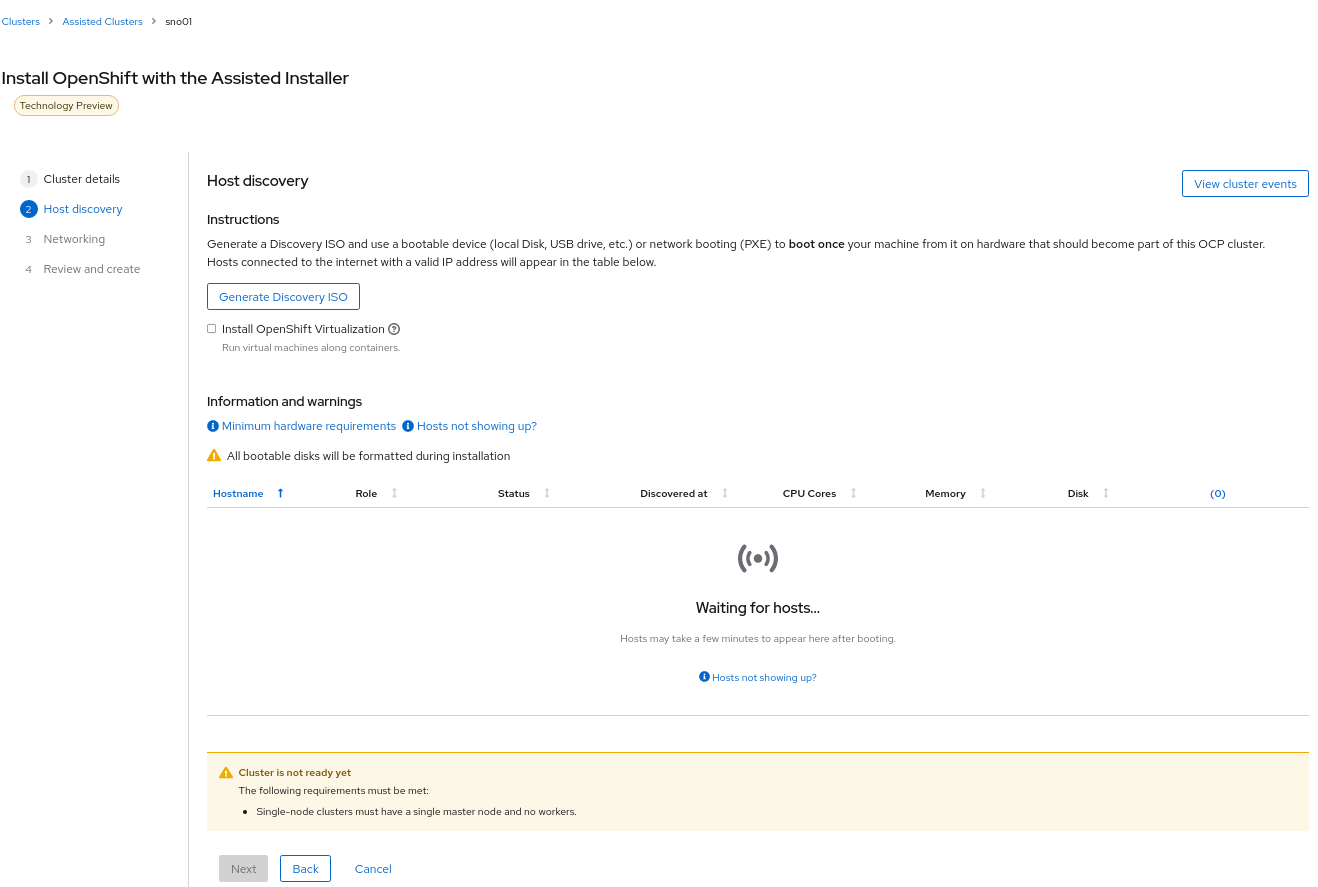
Then click on button “Generate Discovery ISO”
Select Minimal image file.
Paste your public key (check Optional requirements section)
In case you need to add a proxy configuration for your setup, this is the time to define it.

Click on “Generate Discovery ISO” button, a temporary download link will appear
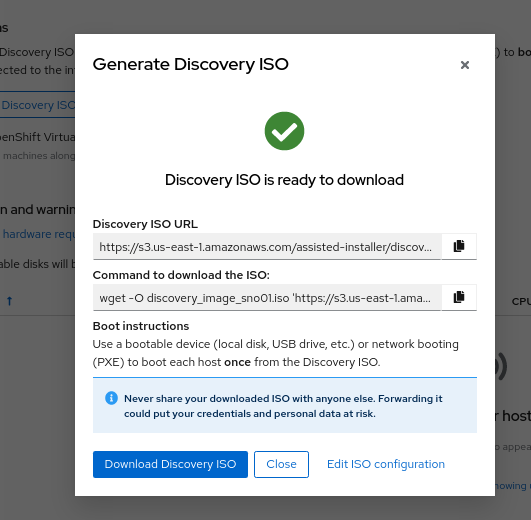
Copy the field “Command to download the ISO” or download to your PC with button “Download Discovery ISO”
Once the download of the Discovery ISO is complete, you are ready to burn it to the USB flash drive.
Obviously, start by connecting your USB flash drive to your computer.
Fedora / RHEL:
Let’s check the path of the device with “sudo fdisk -l”.
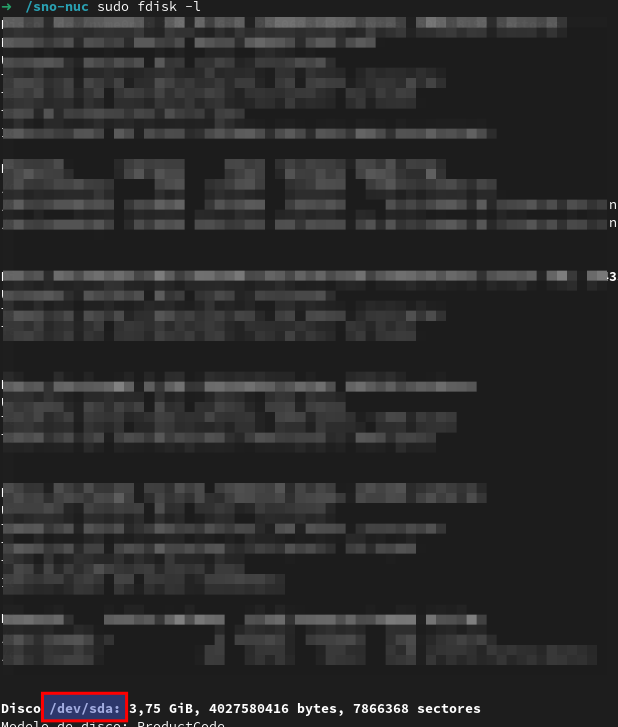
You need to identify the path of type /dev/sdN, in my case is /dev/sda if yours takes another path, replace it in the next step.
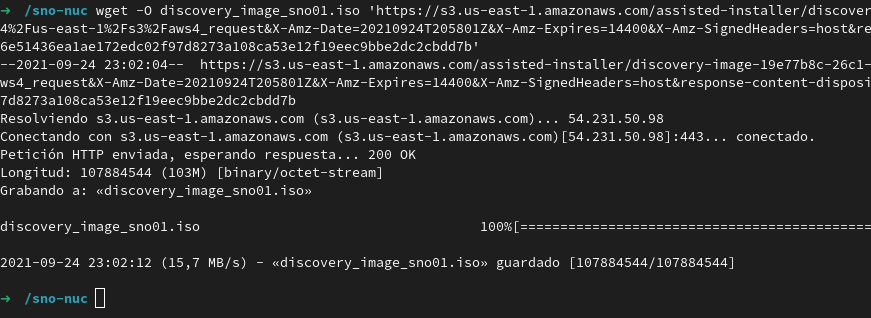
Let’s burn the ISO to the USB with the command;
sudo dd if=discovery_image_sno01.iso of=/dev/sda status=progress

The whole installation process is performed in several phases.
Each and every installation phase can be monitored and customized from the remote interface.
This section will guide you through the installation process and will highlight the potential issues and customization you’ll be asked to apply to the SNO configuration.
Plug the USB flash drive to the Intel NUC, don’t forget to connect also the ethernet cable.
You’ll also need to connect a keyboard and a monitor to perform take preliminary actions in order to make the NUC boot from the USB flash drive:
Power the NUC on;
When the NUC logo shows on the screen, Press F10 to access the boot menu;
If you are keen to apply persistent changes to the boot menu, press F2 instead and enter the BIOS menu;
Do not apply any changes to the default BIOS performance config, just set up the Boot section accordingly;
Select your USB flash drive from the boot menu to boot from it;
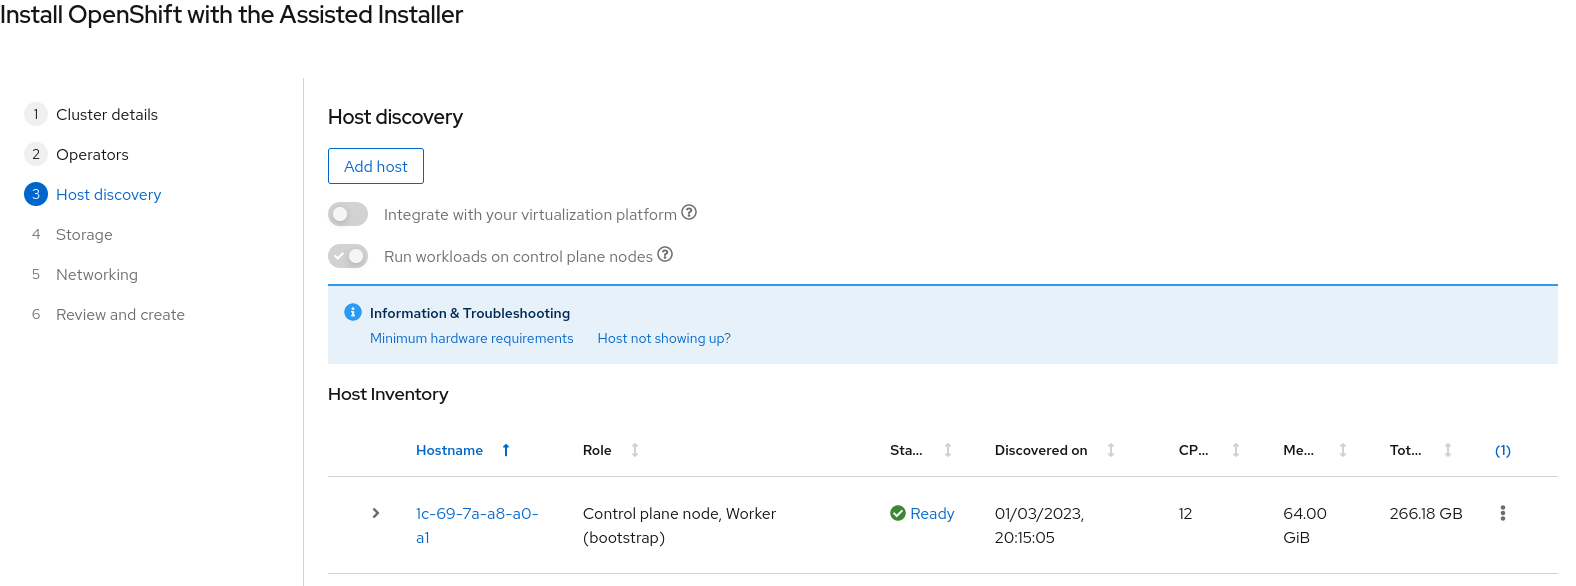
Return to the browser at the Host Discovery page;
After a short time the status of your host will turn into Ready.
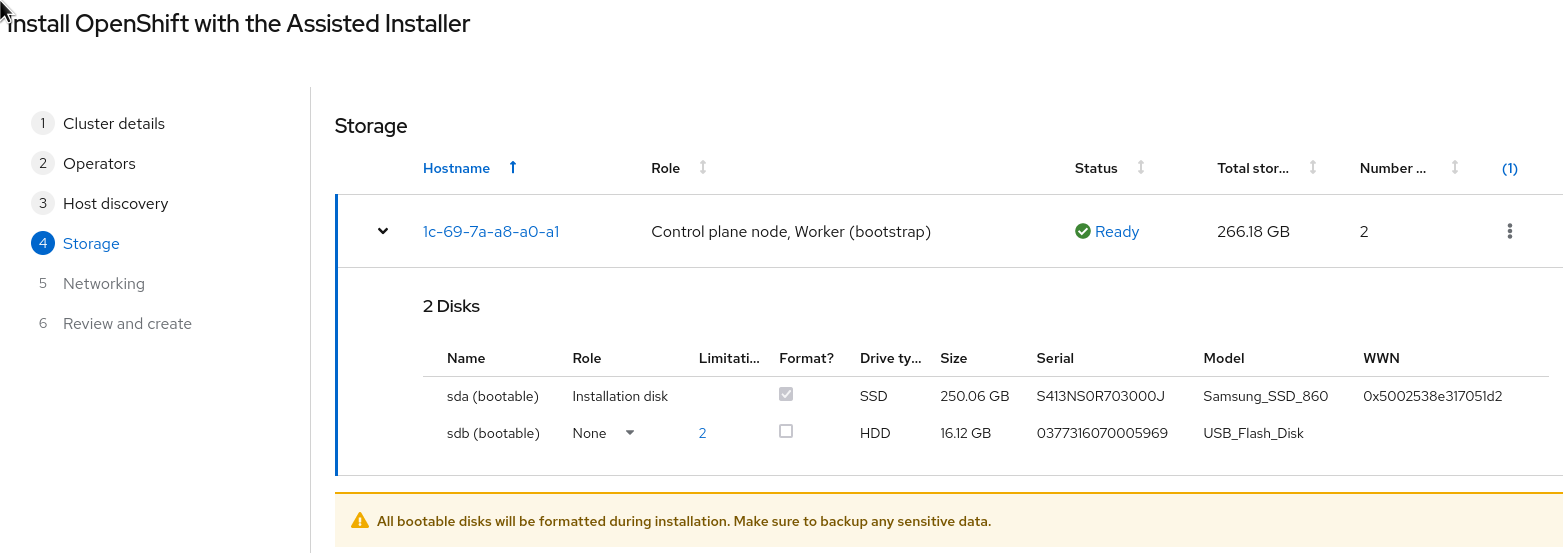
Leave the formatting options as default, to format the SSD, but not the flash drive that you are using to install SNO! :-)
Click Next to continue to Networking section.
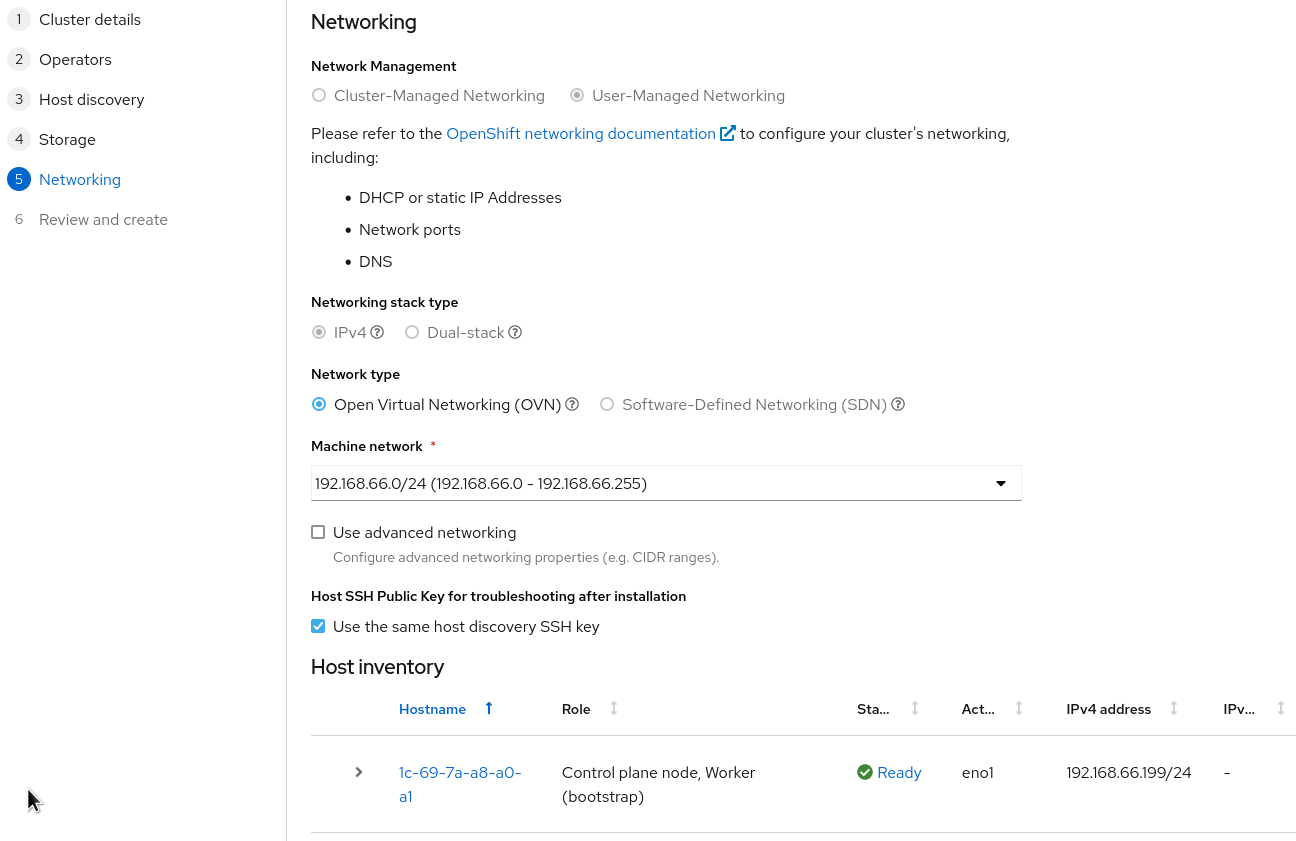
In the networking section you’ll be asked to pick a machine network. You can probably leave everything here as default unless you need to setup anything differently. Note that you should select "OVN" as the networking standard in modern OpenShift.
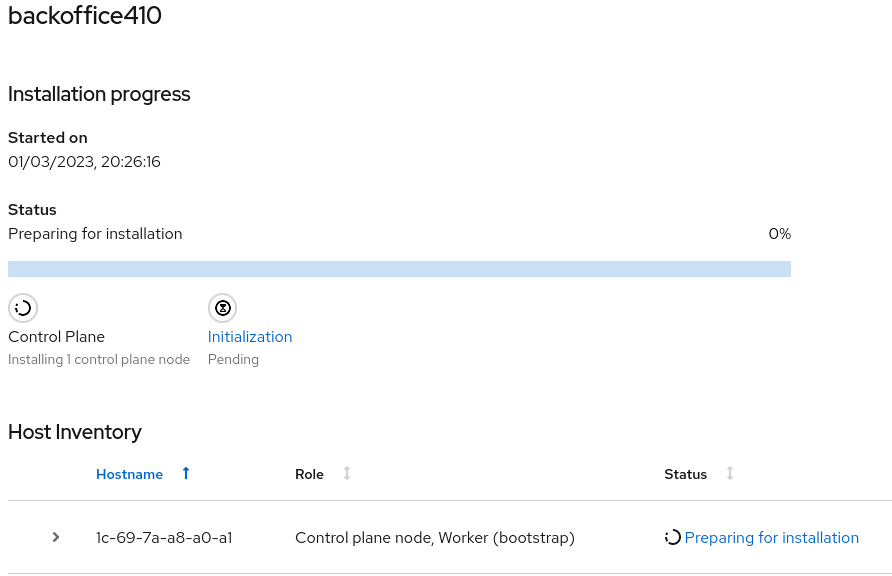
This page gives you an overview of the overall installation process.
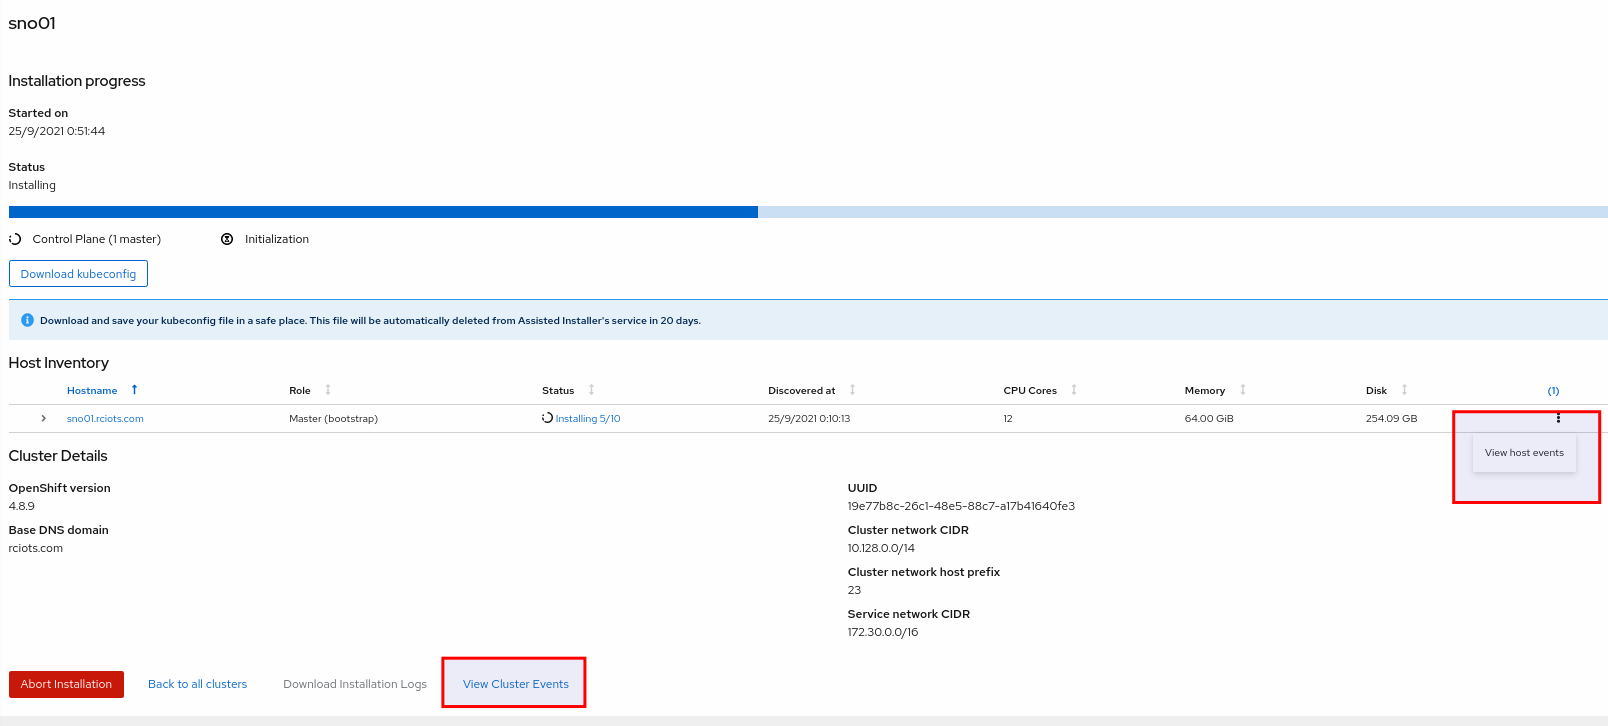
The logs of the cluster and node installation can be consulted:
Once the installation process reboots, the machine will need to boot from the disk.
In case the machine keeps booting from the USB flash drive. the installer will warn you about it:
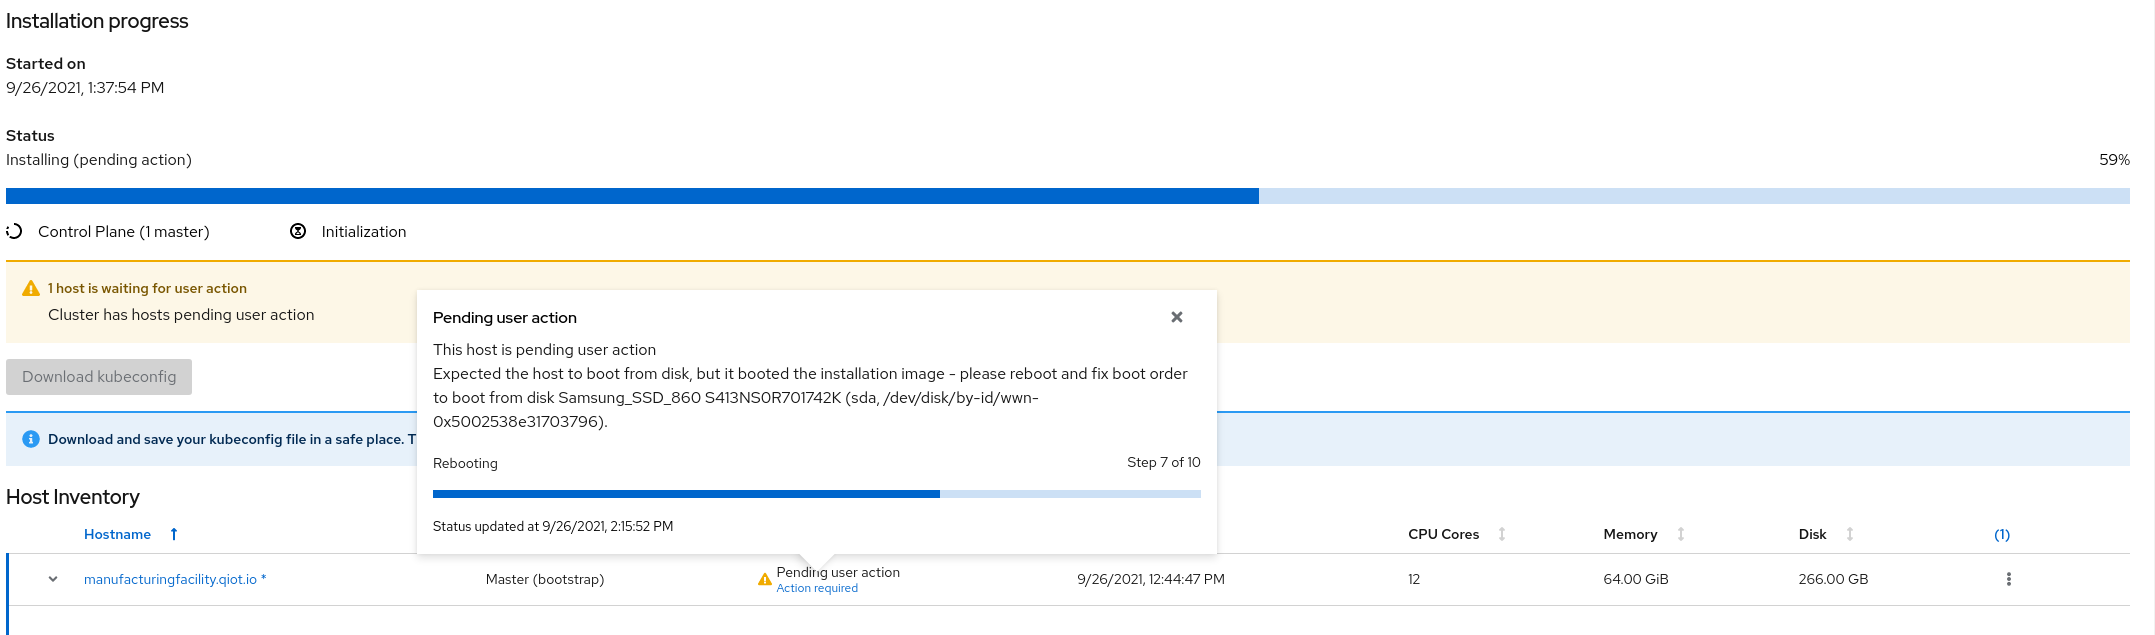
Remove the USB and reboot the Host.
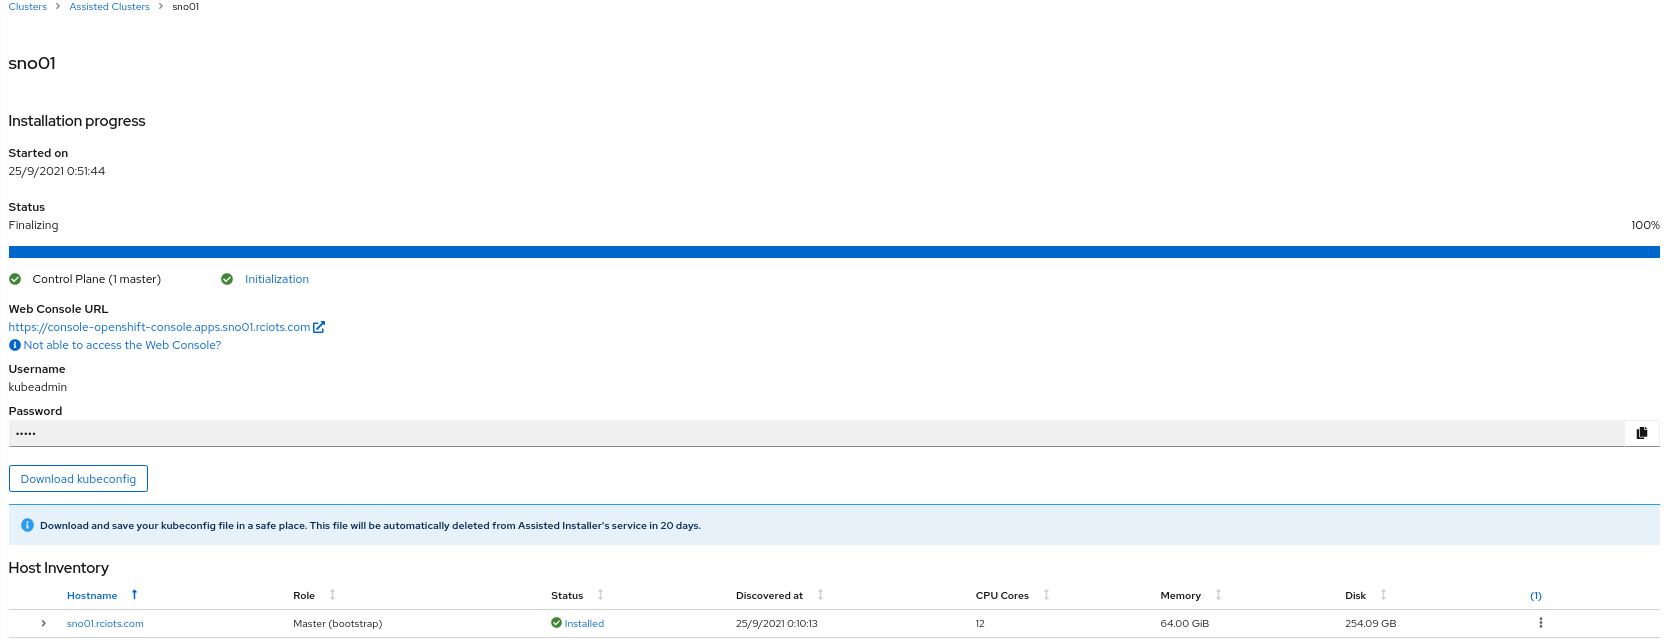
It will take about 30 minutes to the installation process to complete. Duting that timeframe, the process will complete the installation of the SNO on the machine and will perform an update of the current version, up to the latest fix version (e.g.: 4.8.2 → 4.8.9).
Once the installation process is complete you will obtain the kubeadmin password and the url to login to the console:
In order to access the SNO Web Console, you need to setup the hostname resolution for the SNO running on the NUC.
Given:
XXX.XXX.XXX.XXX = your SNO IPIt’s possible to pick up one of the following options:
Use an external DNS server or local configuration to resolve the SNO hostname.
Add the following records to your DNS server (recommended)
api.cluster_name.cluster_domain      A	XXX.XXX.XXX.XXX
*.apps.cluster_name.cluster_domain   A	XXX.XXX.XXX.XXX
Optional:
cluster_name.cluster_domain A XXX.XXX.XXX.XXXcluster_name.cluster_domain to the NUCDuring the installation of Single Node Openshift a fully functional DNS server with the required wildcard DNS is configured. So you can redirect all DNS queries for the subdomain cluster_name.clusterdomain to the NUC
Modern Linux Systems like RHEL or Fedora use NetworkManager for Networking configuration and use dnsmasq for local DNS caching. To setup DNS on a RHEL 8 client you can create the file /etc/NetworkManager/dnsmasq.d with the follwoing content:
server=/apps.cluster_name.cluster_domain/XXX.XXX.XXX.XXX
host-record=api.cluster_name.cluster_domain,XXX.XXX.XXX.XXX
Then power-cycle NetworkManager and you are good to go.
$ sudo systemctl NetworkManager restartLocal resolution is limited because you cannot specify a wildcard record in your hosts file, meaning you need to set key URLs manually, like so;
Update your local /etc/hosts or /etc/resolve.conf files
XXX.XXX.XXX.XXX	api.cluster_name.cluster_domain
XXX.XXX.XXX.XXX	oauth-openshift.apps.cluster_name.cluster_domain
XXX.XXX.XXX.XXX	console-openshift-console.apps.cluster_name.cluster_domain
XXX.XXX.XXX.XXX	grafana-openshift-monitoring.apps.cluster_name.cluster_domain
XXX.XXX.XXX.XXX	thanos-querier-openshift-monitoring.apps.cluster_name.cluster_domain
XXX.XXX.XXX.XXX	prometheus-k8s-openshift-monitoring.apps.cluster_name.cluster_domain
XXX.XXX.XXX.XXX	alertmanager-main-openshift-monitoring.apps.cluster_name.cluster_domain
Optional:
XXX.XXX.XXX.XXX cluster_name.cluster_domainThen you can access your new Single Node Openshift at the following URL:
